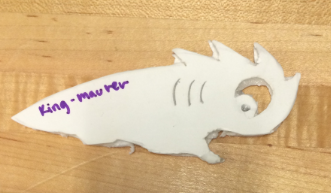
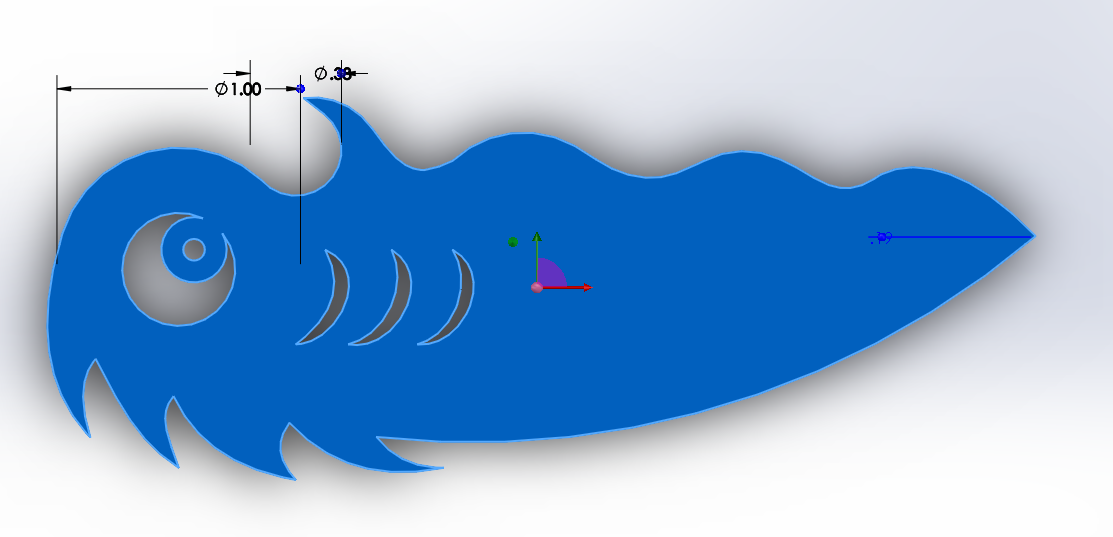
For our first project my partner Helena and I had to design and build a bottle opener from a single piece of delrin using the laser cutter.
Brainstorming:
In order to generate ideas, Helena and I first thought about what typical bottle openers look like and what about their design enables them to open a bottle. From there we generated ideas for bottle openers that were creative and funny to set them apart from the typical bottle opener, but still retain function, After we had chosen our top ten designs, we talked about the possible draw backs of each design. We ultimately decided that a lever design as opposed to a ledge design would be best. Our reasoning behind this was that the delrin would be stronger if the force applied to it was not applied in such a way that it could bend along its plane. If the force is exerted perpendicular to the plane then the cross sectional area is decreased which produces a large deflection. Also, we believed that a ledge design would not provide enough leverage on the bottle cap without extra prongs to grab the bottle, which was not feasible with a 2D sheet of delrin. Thus the lever design would increase the cross sectional area and be less cumbersome to use.
Next, we redrew our favorite design. We measured the height and distance of the bottle cap to ensure that it would fit the bottle top properly. We included the wavy lines at the bottom of the bottle opener, to provide a comfortable and natural grip for the users hand. Each valley corresponds with a finger that would grip it. We thought that this would allow the user to easily grip the piece. The round part on the head of our bottle opener is meant to concentrate the downward force on the center of the bottle cap as a sort of fulcrum that the hook could pull against when upward force was applied.
Iterations:
Next we cut out a foam core model of our bottle opener to ensure that it fit properly over the bottle cap. since our design has many curved lines, it was very difficult to cut out. Upon inspecting our foam core, we decided that the areas that the bottle opener was most likely to fail would be at the hook, or in the thin area created by cutting out a place for the eye. With this in mind we set out to draw our design on Solid Works.
After inspecting our foam core model, Helena and I went to Solid Works to make a drawing that could be used by the laser cutting software. Our first iteration of our design (pictured above) proved to be unsuccessful. I was not present when this design was cut by the laser cutter, but Helena said that she had quite a bit of trouble getting the scale to convert correctly to the computer hooked up to the laser cutter. As a result, the entire piece was about a centimeter shorter than the dimensions we chose in solid works. The shortened piece did not allow the head of the bottle opener to make contact with the top of the bottle cap in the center as was needed. The hook was also too small and too thin to support the amount of force necessary to open the bottle. We also realized that changes were needed in order to make the bottle opener more comfortable to hold. The wavy portion on the bottom proved to be helpful as we expected, but the valleys were not large enough because of the change in scale. Also, the 4th spike on the back of the bottle opener's head dug into my hand when I tried to open a bottle with it.
In order to fix the problems we encountered with our first iteration, Helena and I went back into Solid Works. First we rounded the tip of the hook and thickened it to give it added strength and durability. With a rounded tip the force is more evenly distributed on the piece rather than on the point, therefore decreasing the likelihood that the piece might chip off like in the first iteration. By thickening it we increased the cross sectional area and therefore decreased the deflection on the hook, making it more durable and strong. Next we moved the rounded head of the bottle opener out about half a centimeter to make sure that the fulcrum point hit the bottle cap in the center. We aslo eliminated the last spike on the back of the bottle opener's head and rounded the third one to ensure that the user's hand wouldn't be punctured like mine was by the first iteration. Lastly, we added a small hole at the tail of our bottle opener to make it easily attachable to a key chain.
The Moment of Truth:
This final iteration proved to be successful! It easily opened the bottle, while being comfortable for the user and amusing in its design!
Engineering Analysis:
Cantilever Beam Equation

However, this fails to take into account that the user of the bottle opener must have enough material to grip properly and apply force to. It also fails to account for the fact that the type of force being applied to the bottle opener is a kind of Torque modeled by the equation Torque = Fr where F is the force perpendicular to the radius (r) from the fulcrum point. As shown by the equation as the radius increases the Torque increases even if the force does not.
when both of these equations are considered, I believe that our design is the optimal compromise between the appropriate length and (I) of our design to allow the user to apply a reasonable amount of force, while not compromising the structure of the design caused by a high deflection.
Cantilever Beam Equation

deltaB=deflection
F=Force
L=Length
E=Young's Modulus (material stiffness)
I=Area moment of inertia (stiffness of cross-sectional area)
Using this equation which models the physics behind
cantilevers often found on bridge sites. We can explore the physics behind a
successful bottle opener. The goal of a successful bottle opener would be the
lowest deflection possible for that material. E (Young's Modulus) is constant
within the context of this assignment since the material used was delrin. We
also cannot control F since we cannot tell what force the user will put on the
bottle. For the purposes of this analysis I will assume that a reasonable
amount of force capable of a normal person is being applied to the bottle
opener. That leaves only L and I for us to consider in our design. In the
Equation, L is raised to the 3rd power, while I is in the denominator. This
suggests that as the L (length) of a design with a given I increases, the
deflection of the design increases exponentially. Also, this suggests that as
the I of a design with a given L decreases the denominator gets smaller
allowing the numerator to get much larger. Based on this mathematical reasoning
a shorter length and larger I would give the lowest deflection.
However, this fails to take into account that the user of the bottle opener must have enough material to grip properly and apply force to. It also fails to account for the fact that the type of force being applied to the bottle opener is a kind of Torque modeled by the equation Torque = Fr where F is the force perpendicular to the radius (r) from the fulcrum point. As shown by the equation as the radius increases the Torque increases even if the force does not.
when both of these equations are considered, I believe that our design is the optimal compromise between the appropriate length and (I) of our design to allow the user to apply a reasonable amount of force, while not compromising the structure of the design caused by a high deflection.
Reflection:
This project was a valuable learning experience in many ways. One thing I learned was that being able to do multiple iterations is very valuable when addressing a problem. Multiple iterations is valuable because often drawings or even foam core cannot show me how the part will actually behave once it is made. This way, unforeseen problems can be addressed and corrected before the final iteration. I also found it useful to see the actual effects of the physics behind the part manifested in the design. Small changes in dimensions of angles can severely alter the physics and thus alter the effectiveness of a design, Lastly, I learned the basics of solid works and how to prepare a drawing for the laser, both of which can be finicky processes.
This project was a valuable learning experience in many ways. One thing I learned was that being able to do multiple iterations is very valuable when addressing a problem. Multiple iterations is valuable because often drawings or even foam core cannot show me how the part will actually behave once it is made. This way, unforeseen problems can be addressed and corrected before the final iteration. I also found it useful to see the actual effects of the physics behind the part manifested in the design. Small changes in dimensions of angles can severely alter the physics and thus alter the effectiveness of a design, Lastly, I learned the basics of solid works and how to prepare a drawing for the laser, both of which can be finicky processes.


I really like your design! My partner and I leaned that same lesson about how important iterations are when it comes to using Solidworks as well.
ReplyDeleteYour design was so cool and I like that you were were able to clearly explain each of your iterations.
ReplyDeleteI really loved your design for the bottle opener as the shape was entertaining in itself. It was interesting to see the progression of the original design into the final product and how you had to remove the fourth spike on the head.
ReplyDelete